If you wish to set up a VPN connection through OpenVPN protocol we strongly recommend you to use our Mac OS X app for Apple computers with version 10.10 or newer.
TUNNELBLICK INSTRUCTIONS
These are the instructions for Tunnelblick. You can find Viscosity instructions below Tunnelblick instructions on this page.
1. Download Tunnelblick. Tunnelblick provides free, user-friendly control of OpenVPN client connections for Mac OS.
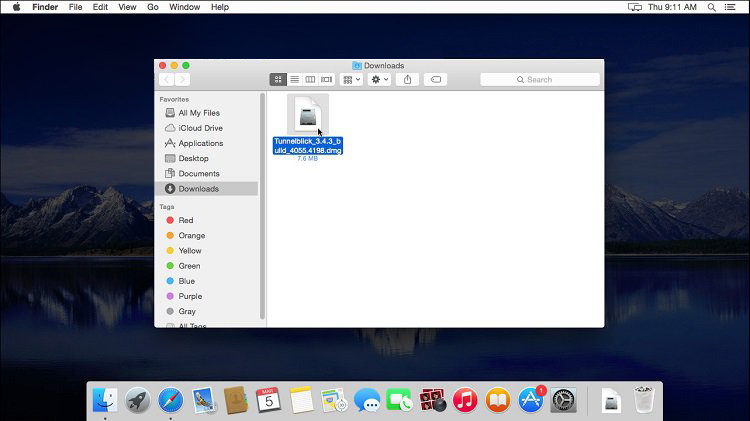
2. To begin installation of OpenVPN for Mac OS, navigate to your Downloads folder and double click the Tunnelblick disc image (DMG) file you just downloaded.
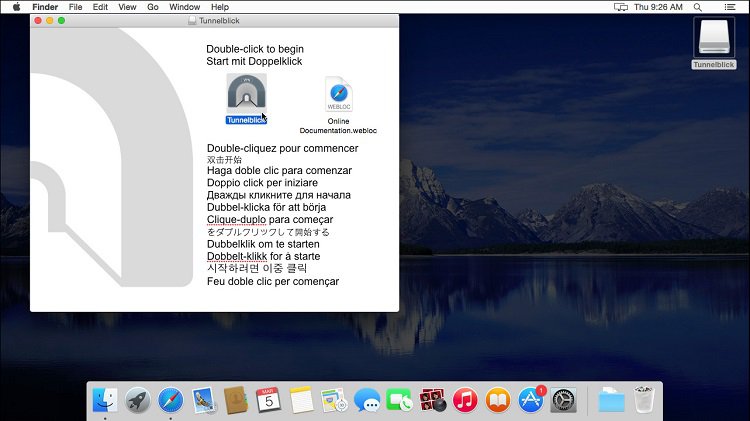
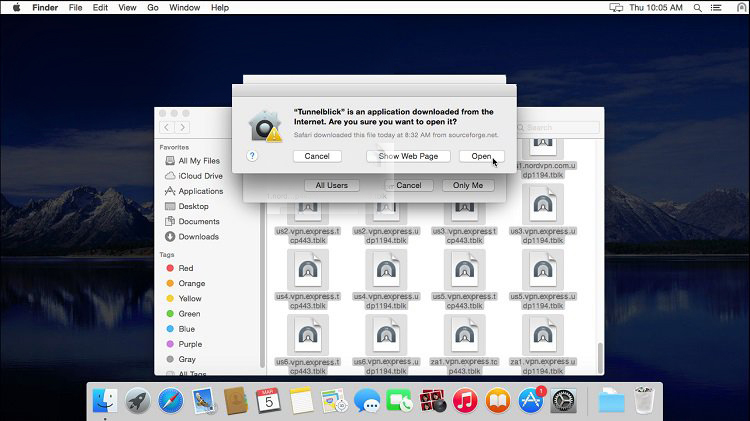
4. Double-click on the Tunnelblick icon in the Tunnelblick disk image Finder window.
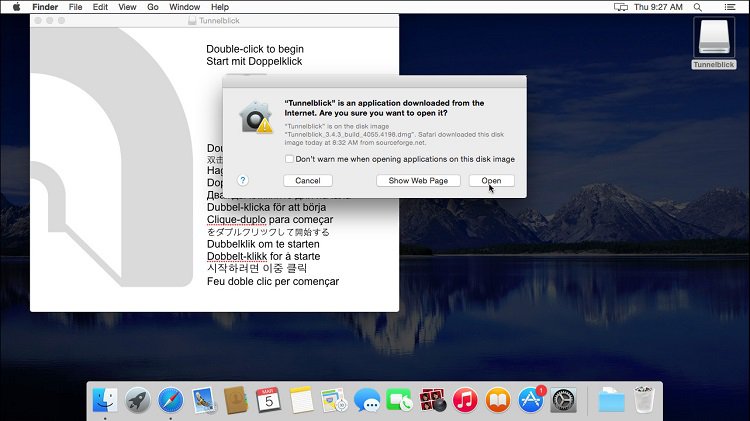
5. A new dialogue box appears: Tunnelblick is an application downloaded from the Internet. Are you sure you want to open it? Click Open.
6. An installation dialogue appears: Install Tunnelblick? Click Install.
7. A dialogue box appears: Installation succeeded. Tunnelblick was successfully installed. Do you wish to launch Tunnelblick now? (An administrator username and password will be required so Tunnelblick can be secured.) Click Launch.
8. You may see a dialogue box: Tunnelblick needs to repair ownership/permissions of the program to secure it. Type your password to allow Tunnelblick to make changes. If so, enter your computer’s admininstrator username and password and click OK. Then exit Tunnelblick totally.
9. Unzip the MAC OS configuration package you have downloaded. If you do not have any file archiving software on your machine you can use a software called “Keka” to extract it.
10. VERY IMPORTANT: Please make sure the Tunnelblick is not running in the background – the configurations would fail to be imported if Tunnelblick is running.
11. Select all Mac OS configuration files and double-click on one (An administrator username and password will be required). By doing this, you will add the servers to the Tunnelblick server list.
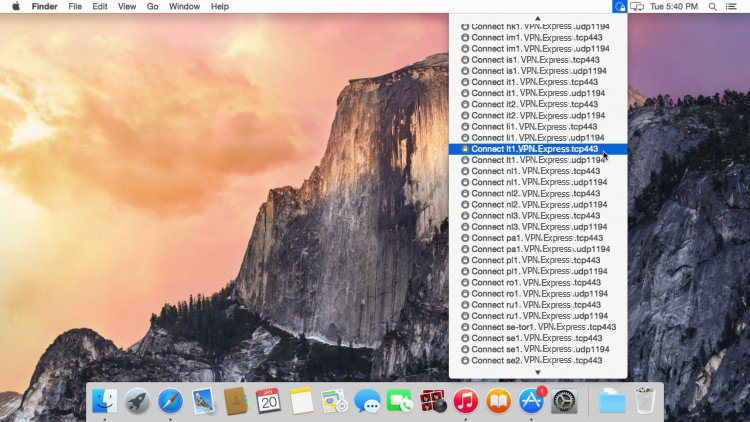
12. Find the Tunnelblick icon in your menu bar (top right). Click on the Tunnelblick icon to bring down the dropdown menu and you will see the list of our servers.
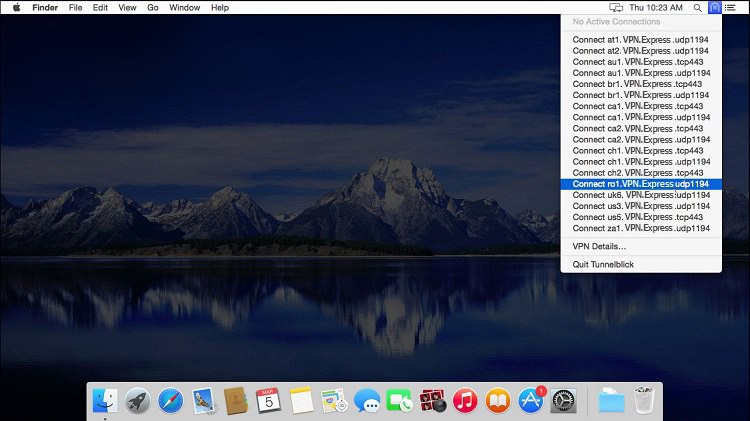
13. Select the server and click connect.
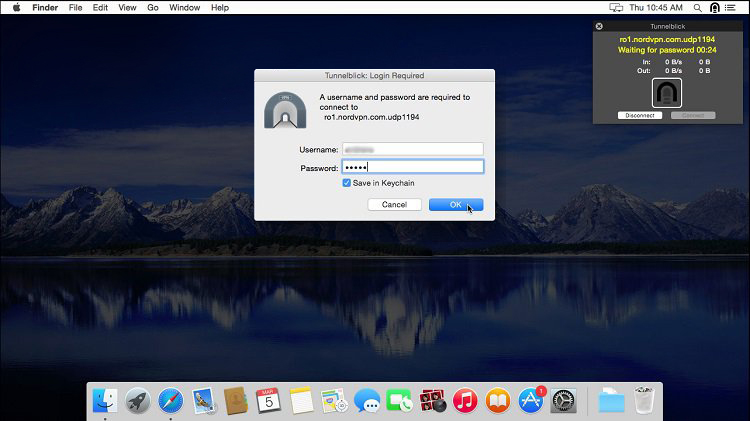
14. Enter you VPN credentials, mark the box Save in Keychain and click Ok.
15. You are connected to VPN. To disconnect click on the Tunnelblick icon in your menu bar and select Disconnect from the drop down menu.

VISCOSITY INSTRUCTIONS
1. Download Viscosity (Mac OS 10.7 or later is required). Viscosity is an OpenVPN client with intuitive interface offering complete configuration of OpenVPN connections on Mac OS.
2. Download the Mac OS configuration files package.
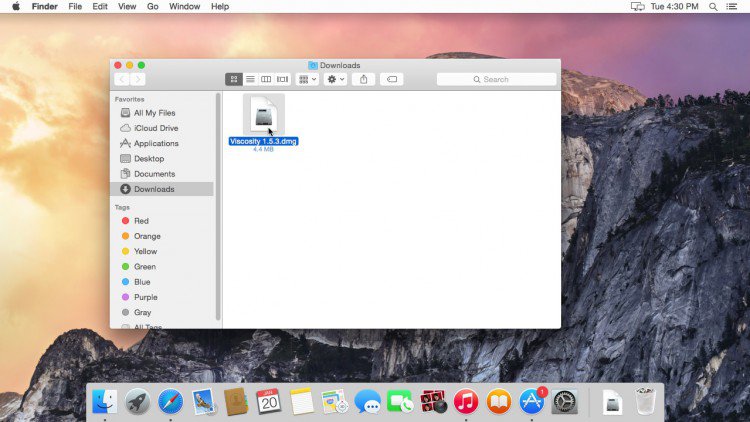
3. To begin installation of OpenVPN for Mac OS, navigate to your Downloads folder and double click the Viscosity disc image (DMG) file you just downloaded.
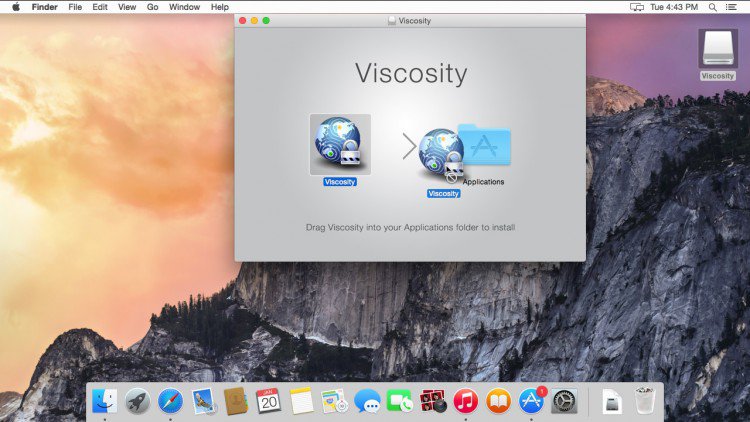
4. New window will pop up asking to drag the Viscosity icon inside the Applications folder in order to install Viscosity. Select and drag Viscosity icon to the Applications folder by holding your left mouse button down, release it once the icon is inside the folder.
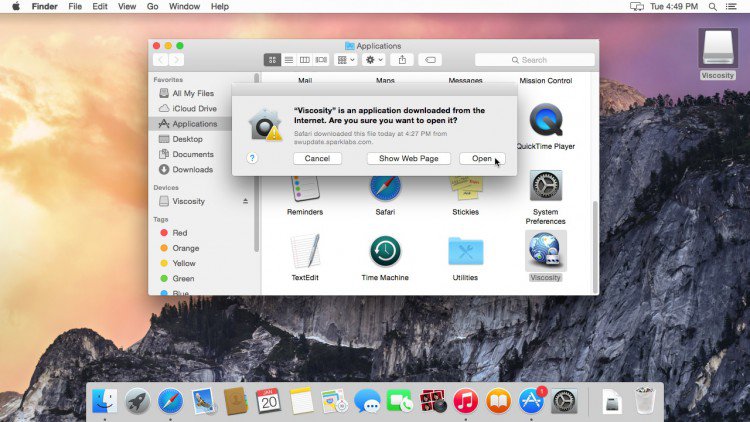
5. Once the Viscosity icon is inside the Applications folder double click it. A new dialogue box appears: “Viscosity” is an application downloaded from the Internet. Are you sure you want to open it? Click Open.
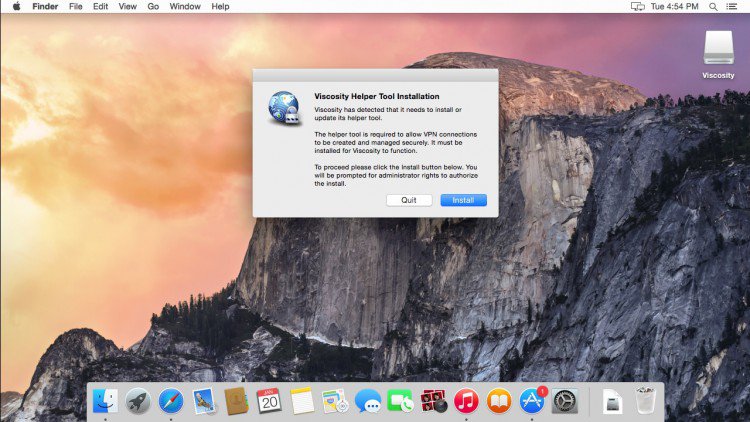
6. An installation dialogue appears: Viscosity Helper Tool Installation. Click Install.
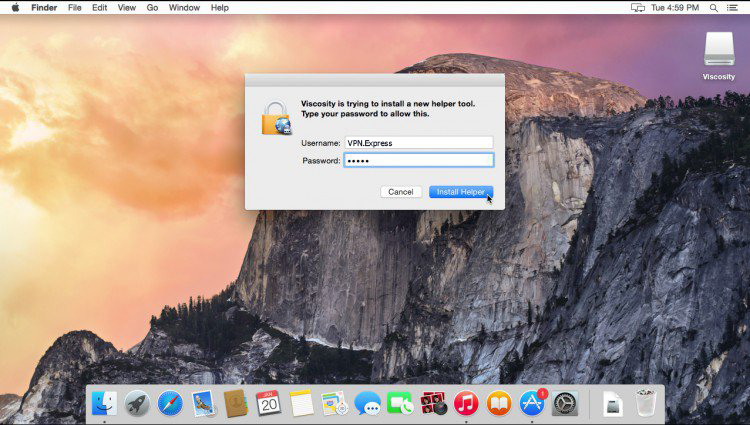
7. A warning appears: Viscosity is trying to install a new helper tool. Type your password to allow this and click on “Install Helper”.
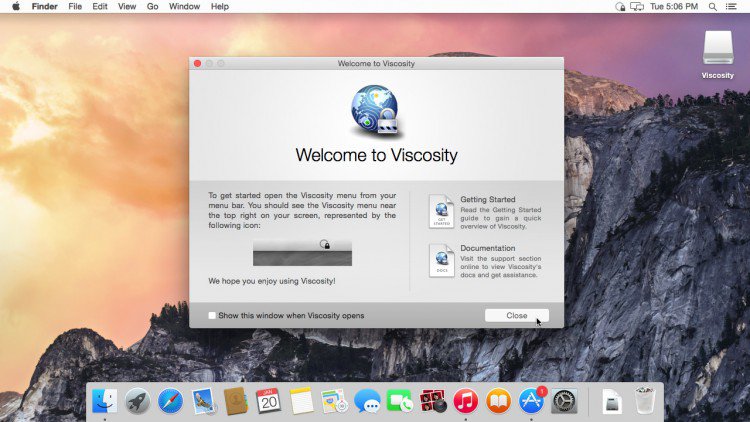
8. After quick installation Viscosity icon appears on your menu bar near the top right corner of the screen and a “Welcome to Viscosity” dialogue which you may close by clicking Close.
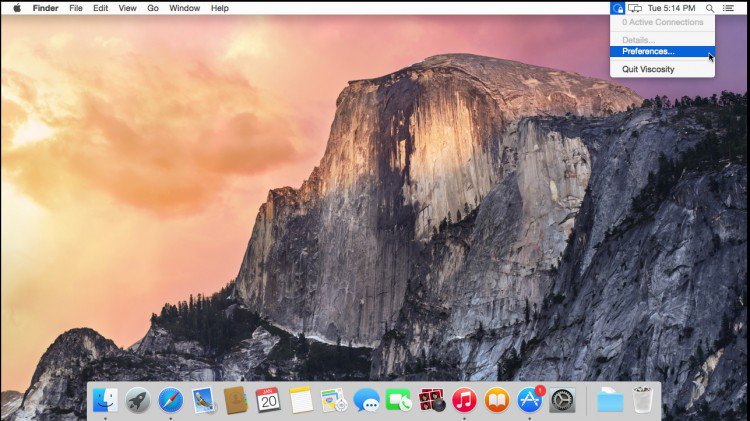
9. Click the Viscosity icon located on your menu bar near the top right corner of the screen and choose Preferences…
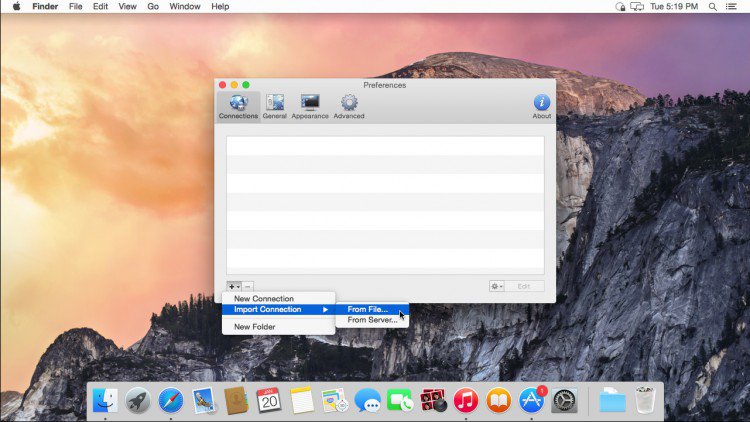
10. In the newly opened window click the plus sign at the bottom right corner and choose Import Connection > From File.. Another window appears in which you should choose config folder which was downloaded on step 2 and click Open.
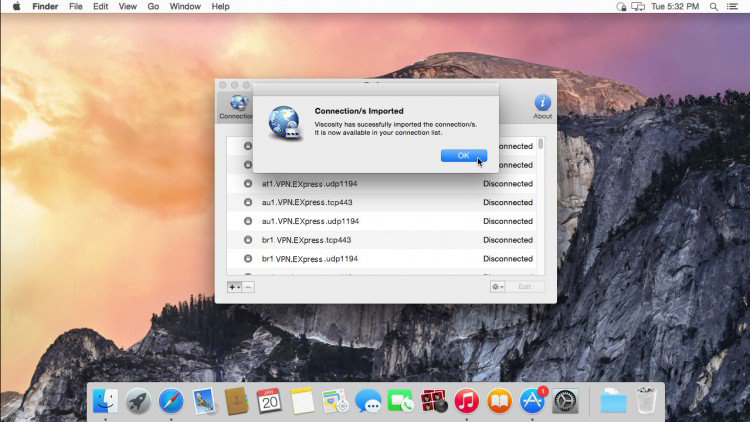
11. Success dialogue should appear saying that connection/s were imported successfully and you should already see connections in the background. Click OK and close the window.
12. Click the Viscosity icon located on your menu bar near the top right corner of the screen, you should see a list of servers in a dropdown menu. Choose a serverto connect to click on it once.
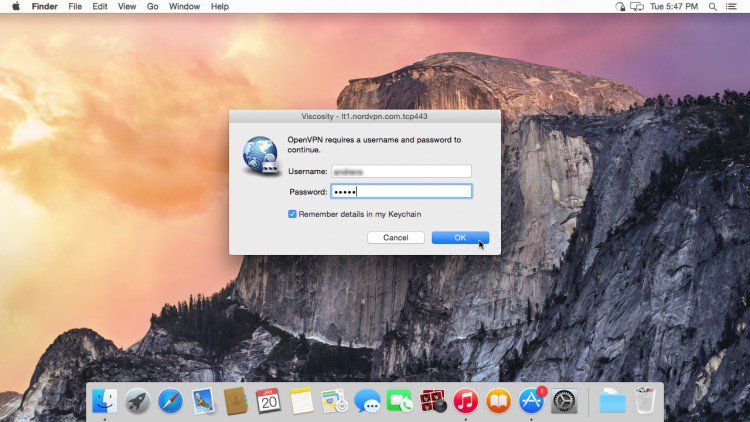
13. A new box appears asking for credentials. Enter your VPNEXPRESS credentials (both username and password are case sensitive), check the box Remember details in my Keychain and proceed by clicking OK.
14. Shortly after connecting success message should appear near the top right corner of the screen. You are connected to VPN. To disconnect, click on the Viscosity icon and click again on the same server and another disconnection message should appear.